
Built by loggers, for loggers.
barrierView product manual
How the barrierView v1 barrier arm system works, how to use it and how to look after it.
November 2026. For barrierView v1 with controller software 2.6 and the barrierView app 3.3.
1. Introduction
The barrierView barrier arm system controls vehicle and machine access to a hazardous area. It puts a physical barrier with signs across the road, and the person managing the hazard raises and lowers it by radio from the machine.
The operator's phone shows each barrier's position, the battery level of its controllers and its radio signal strength. The arms are built to stand up to wind and to be easy to move from site to site.
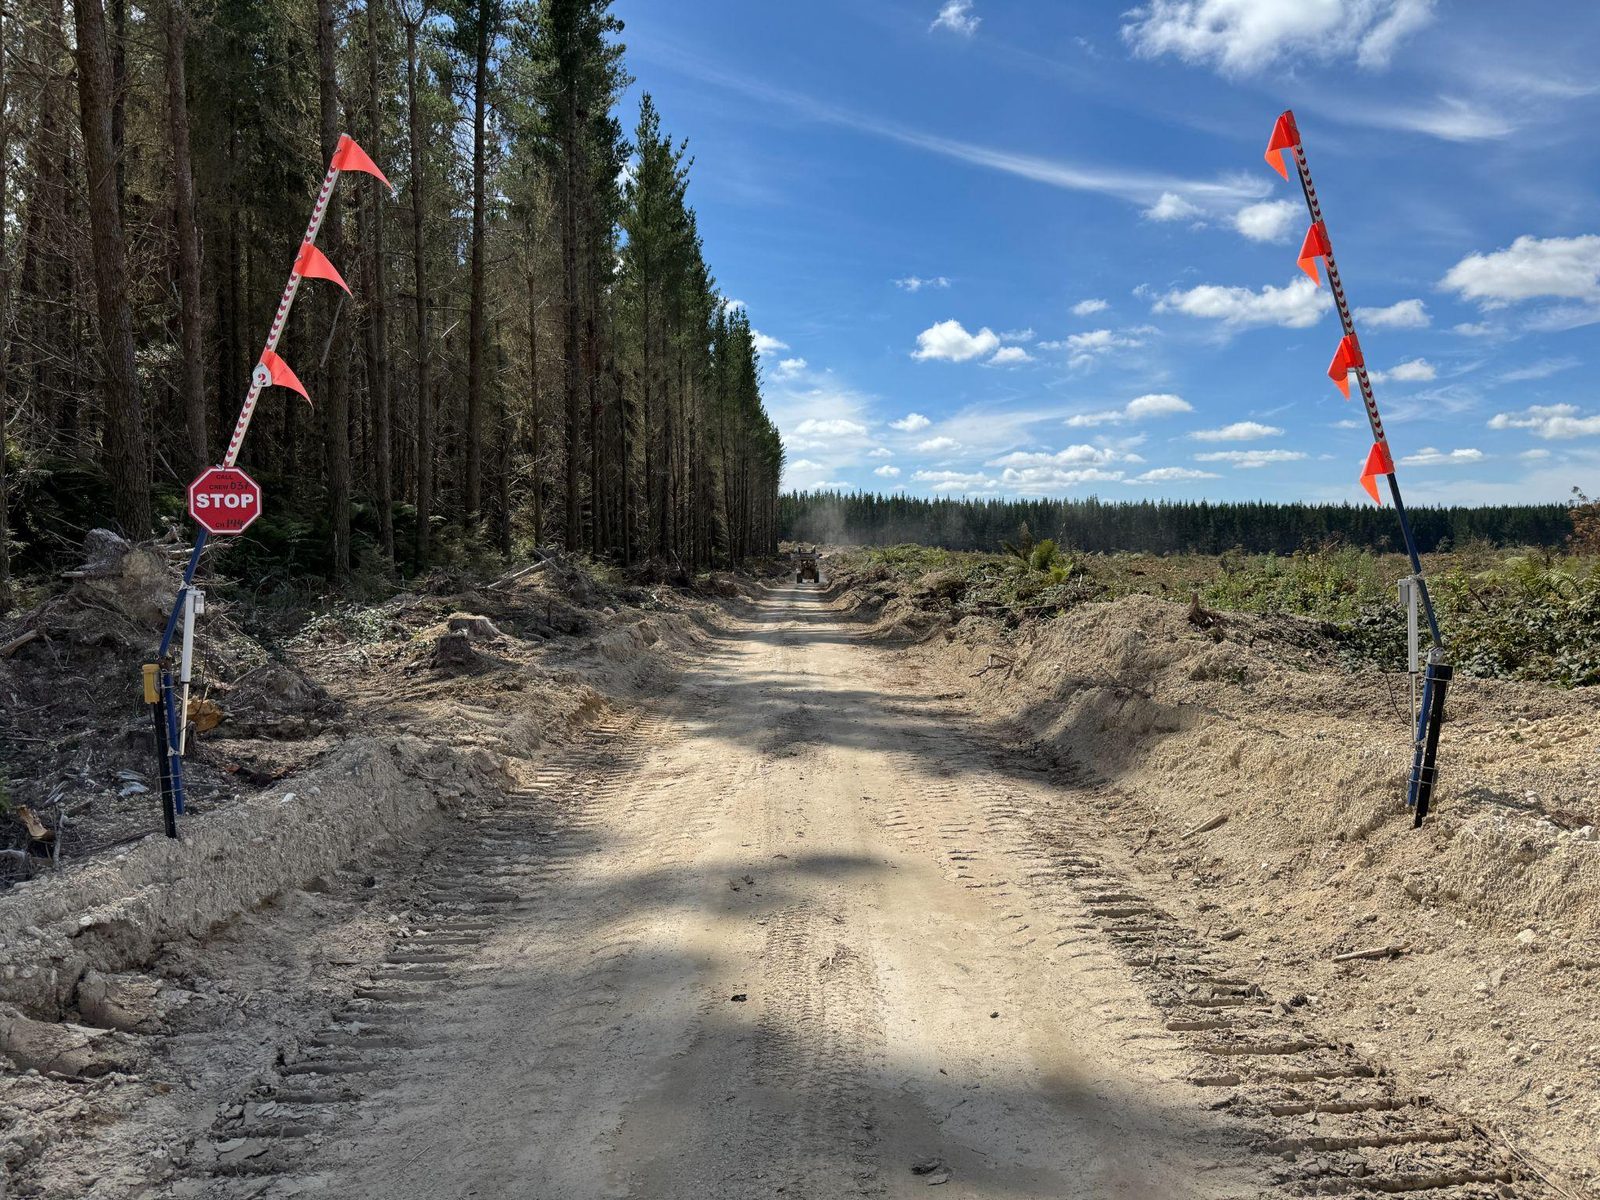
This manual covers barrierView v1, the barrier with the sliding actuator pivot. To put one together, follow the assembly guide, on sensorview.nz/manuals and in the app's Guides tab.
2. How the system works
The operator gives commands from the barrierView app. The phone talks by Bluetooth to a Bluetooth controller in the machine. The Bluetooth controller talks by LoRa radio to the barrier controllers, which drive the linear actuators that move the arms.
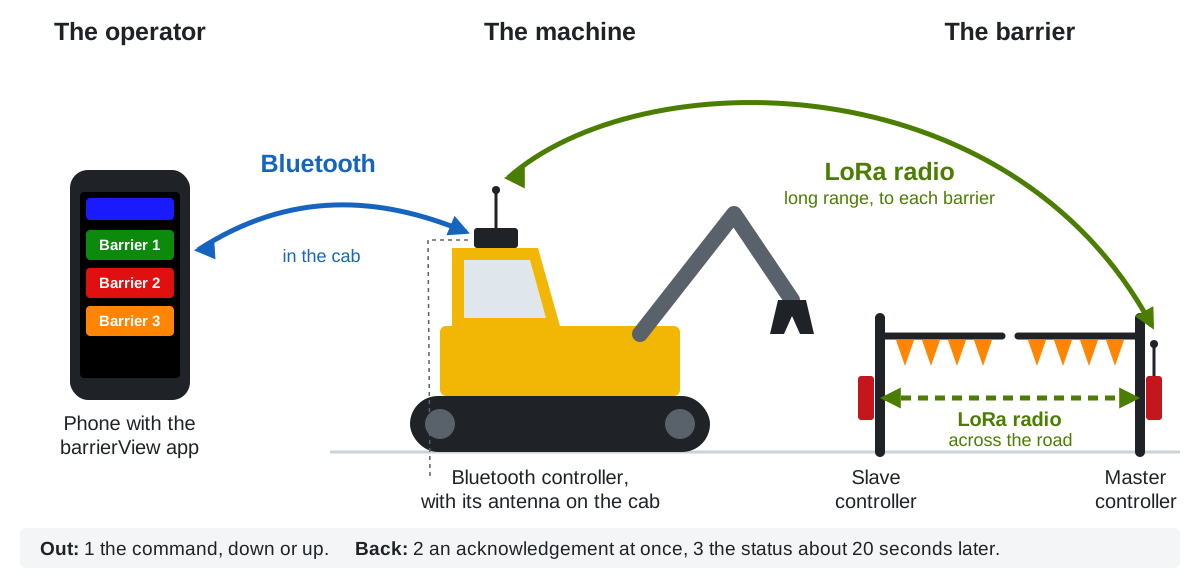
What happens when you tap an arrow in the app:
- Command. The phone sends "down" or "up" to the Bluetooth controller, which sends it to the barrier by radio.
- Acknowledgement. The barrier's master controller answers at once. The barrier's tile in the app turns amber: the barrier has the command and the arms should now be moving.
- Status. About 20 seconds later the barrier reports its position. The tile turns green when both arms are down, or red when the barrier is up or its position is not known.
- Repeat. After that the barrier reports again about every 3½ minutes. If the reports stop, the app shows No Signal for that barrier.
A few things follow from this:
- Amber is not "down". An acknowledgement means the command arrived. Only a green tile means the barrier has reported both arms down.
- The barrier stays where it was last sent. If the radio link is lost, nothing moves.
- Nearby sites do not interfere. Each site's controllers share a site number and radio settings, and each barrier has its own number, so a controller ignores messages meant for another.
3. The controllers and what comes with them
3.1 Controller models
| Model | Radios | Used as | Power |
|---|---|---|---|
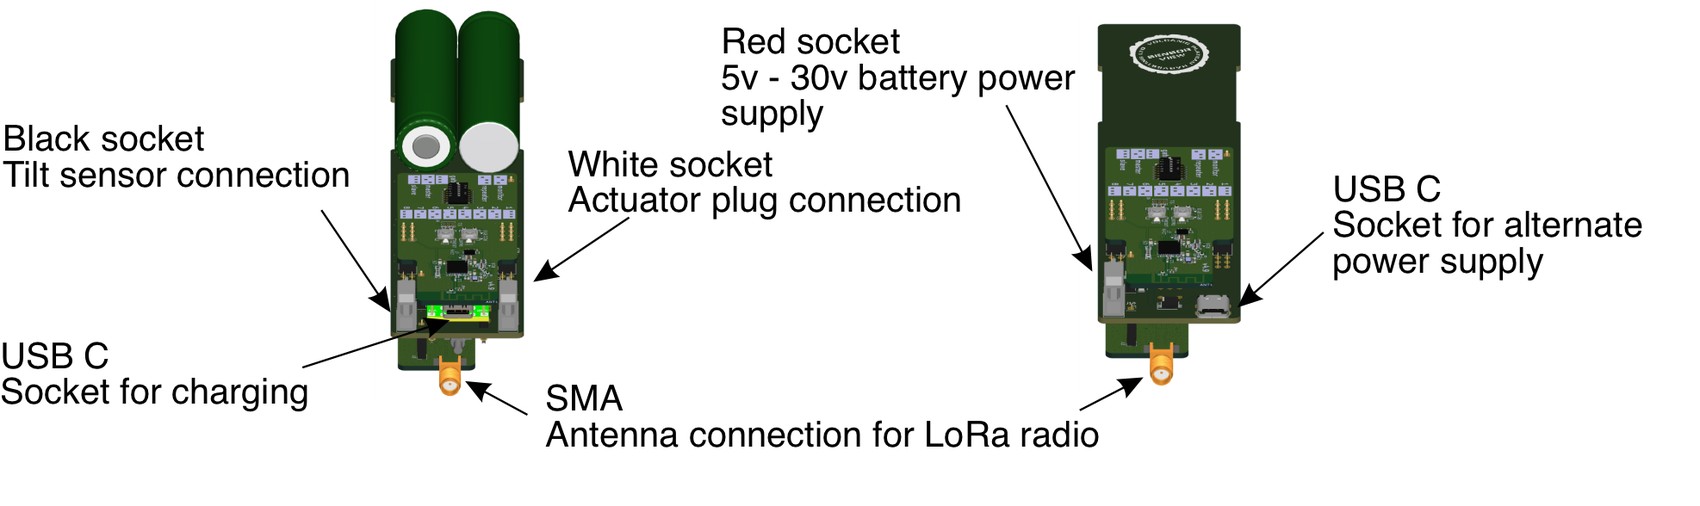
| AV504760 | Bluetooth and LoRa | Barrier controller, or Bluetooth controller | Its own battery, charged over USB-C |
| AV508160 | Bluetooth and LoRa | Bluetooth controller or repeater only. It cannot drive an actuator | An outside supply of 5 V to 30 V |
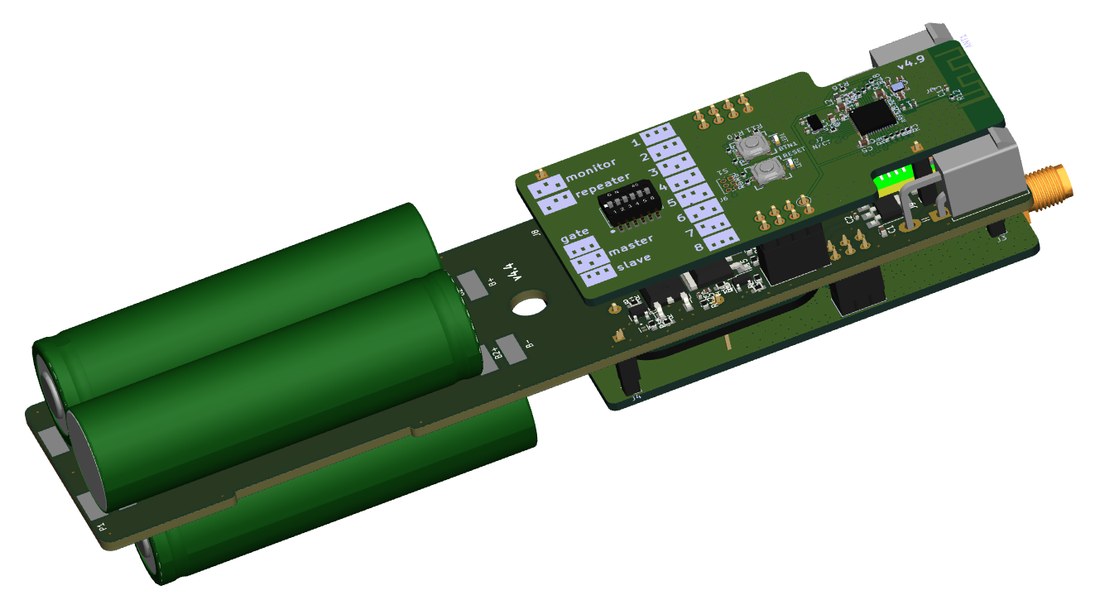
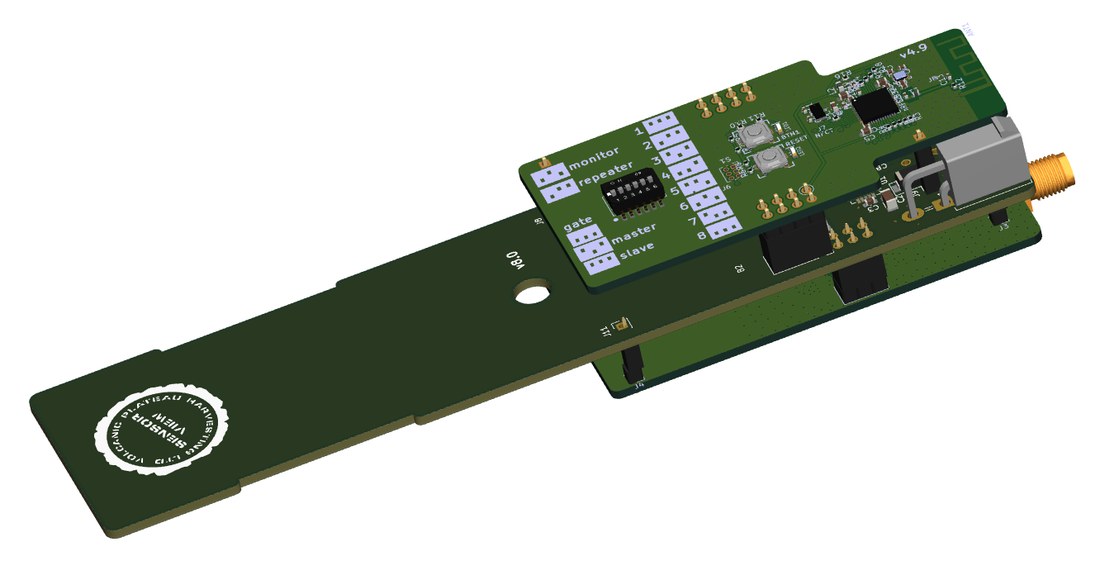
3.2 Connectors
Match the colour of each plug to its socket: black to black, white to white, red to red.
3.3 Charging
Switch the controller off before you charge it. A blinking blue light while the charge cord is in means the controller is running. Charging it like that may damage it.
- Charging port. The USB-C socket takes a standard 5 V USB power supply.
- Battery protection. A battery management system inside balances the cells and protects against a short circuit. After a short circuit, plugging in a USB power cord may be needed to reset it.
- Do not leave a controller flat. A controller left discharged for more than a month can damage its battery.
- A completely flat controller shows no power light when you switch it on. When you plug in the charge cord the blue light may start blinking: switch the power switch off and on once more so the controller is off while it charges.
3.4 Lights
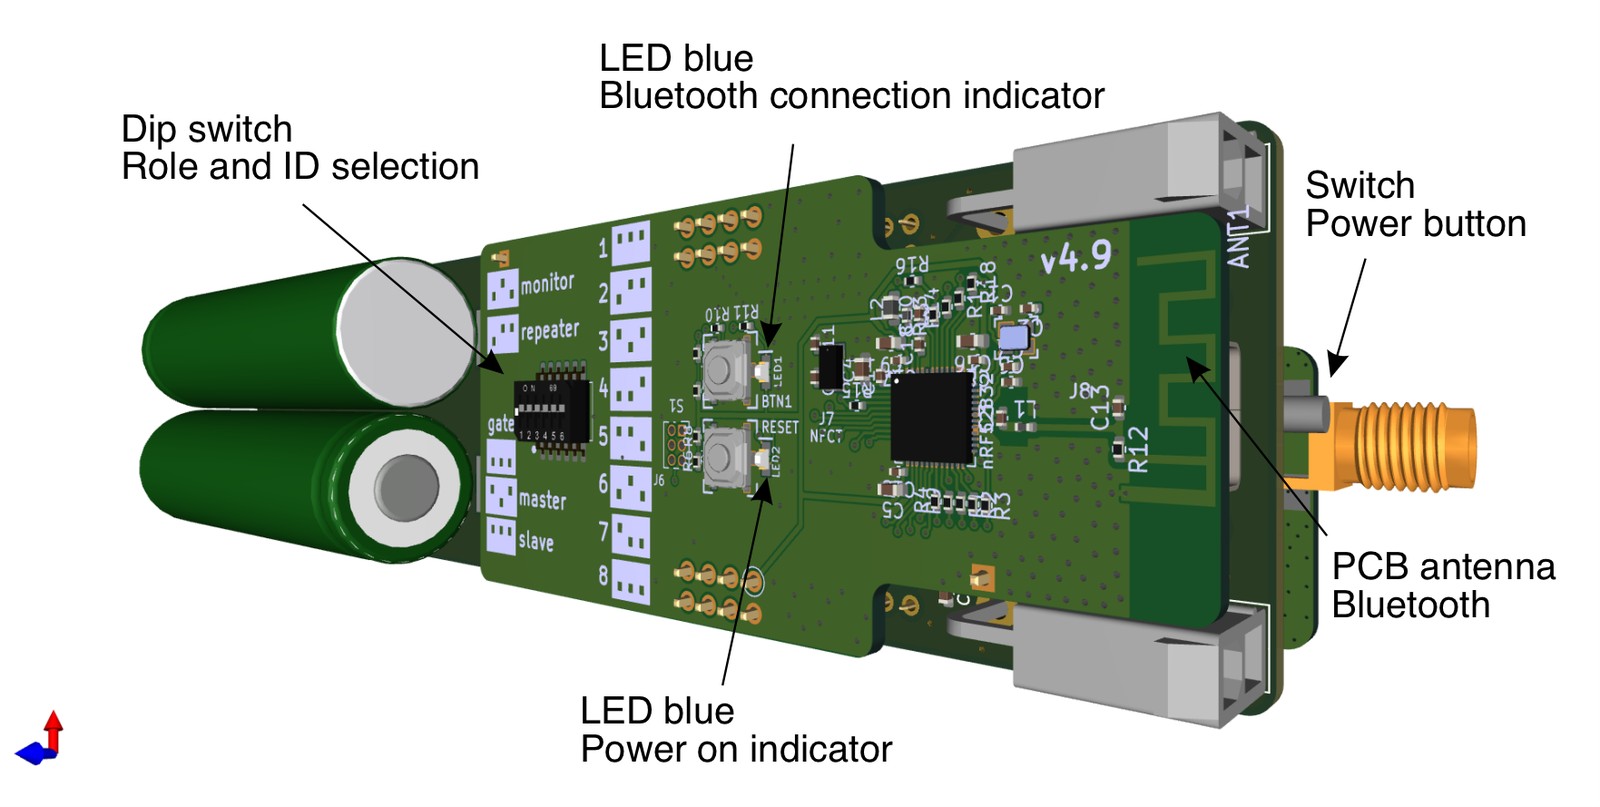
- Power light. Blinks briefly about every 2½ seconds while the controller is on. If it does not light, the controller may need charging.
- Bluetooth light. On a Bluetooth controller it stays lit while it waits for a phone, and goes out when the app connects. On a barrier controller or a repeater set by its switches it stays off: those have no Bluetooth link to the app.
3.5 The case
The case protects the controller from the weather. A 6 mm pin holds the controller in the case.
- Outdoors, the open end of the case always faces the ground.
- Leave the controller in its case. Slide it out only as far as you need to reach the DIP switches.
- Do not touch the circuit board or its parts. Static electricity can damage them.
- Antenna mount. The metal pad on top of the case is where the magnetic antenna sits.
3.6 Antennas
- Magnetic antennas come with the master, gate and Bluetooth controllers. They give the longest range.
- A stub antenna comes with the slave controller, which only has to reach its master across the road.
Range depends on the antennas. Fit them properly, keep the leads from being crushed or kinked, and store them with care.
3.7 Linear actuator
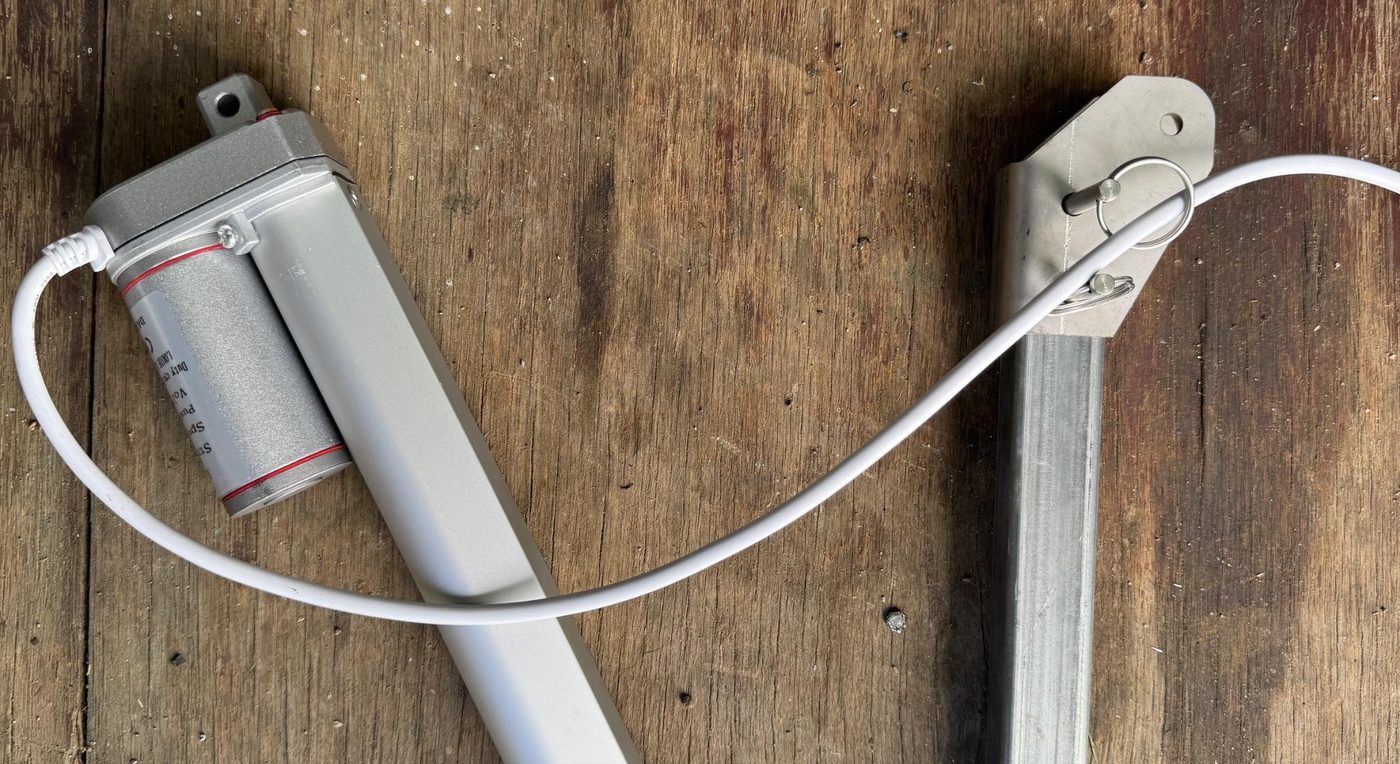
The linear actuator moves the arm when its controller tells it to.
- Water. When an actuator is out in wet weather, or stored, mount it upside down so water drains out of it.
- Frost. Do not run an actuator that is wet and frozen. Thaw it first.
- Cord. Run the actuator cord through a hinge pin ring so it cannot catch on the actuator as it moves (picture 4).
- Motor. Turn the motor to face away from the waratah, so the motor housing cannot bind on the arm.
3.8 Tilt sensor
A tilt sensor at each arm's hinge tells the controller whether the arm is above or below about 45 degrees. A barrier reports down (green) only when both arms' sensors are plugged in and both arms are down.
The sensor is read when the barrier reports, not all the time. An arm moved by hand shows in the app at the barrier's next report, which can be up to about 3½ minutes later.
3.9 DIP switches
The six DIP switches set what a controller does (its role) and its number. A change takes effect when the controller is switched off and on again.
- Role: the three switches nearest the batteries.
- Number: the other three switches. They give numbers 1 to 8, shown in the app as Barrier 1 to Barrier 8.
The controller guide, on sensorview.nz/manuals and in the app's Guides tab, shows the switch positions for each role and number.
One role position is APP. A controller in that position takes its role and number from the phone: see Scan and Set in section 5.5.
4. Roles
Every controller runs the same software. Its role decides what it does.
Stand clear when you switch a barrier controller on. A master, slave or gate controller drives its arm up as soon as it has power.
4.1 Bluetooth controller (monitor)
The link between the phone and the barriers. It stays in the machine, passes the app's commands to the barriers by LoRa radio and passes their answers back. It connects to one phone at a time.
4.2 Repeater
Passes messages on, to reach a barrier that is too far away or behind a hill. A repeater serves the one barrier whose number it is set to.
4.3 Master controller
One of the two controllers of a two-arm barrier. It answers the Bluetooth controller, tells the slave what to do, and reports the barrier's position once the slave has reported its arm.
4.4 Slave controller
The other controller of a two-arm barrier. It follows its master. It starts each of the barrier's regular reports, about every 3½ minutes, and the master passes the report on. The slave's radio is set to low power, so it must be the arm across the road from its master, not further away.
A two-arm barrier needs both controllers running. If the slave is off, flat or out of reach, the master still acknowledges commands, but the barrier sends no reports and the app shows No Signal.
4.5 Gate controller
Runs a single arm or a gate by itself: it answers commands, moves the arm and sends the reports.
5. The barrierView app
The app is how you see and move the barriers. It needs no mobile coverage.
5.1 Installing and connecting
- Install barrierView from Google Play (Android 7 or later) or the App Store (iPhone).
- Allow Bluetooth when the phone asks. Android calls this "Nearby devices"; on Android 11 and earlier it asks for Location instead, which the phone needs to scan for Bluetooth devices.
- Do not pair the phone with the Bluetooth controller in the phone's own Bluetooth settings. Connect from the app.
To connect:
- Switch the Bluetooth controller on.
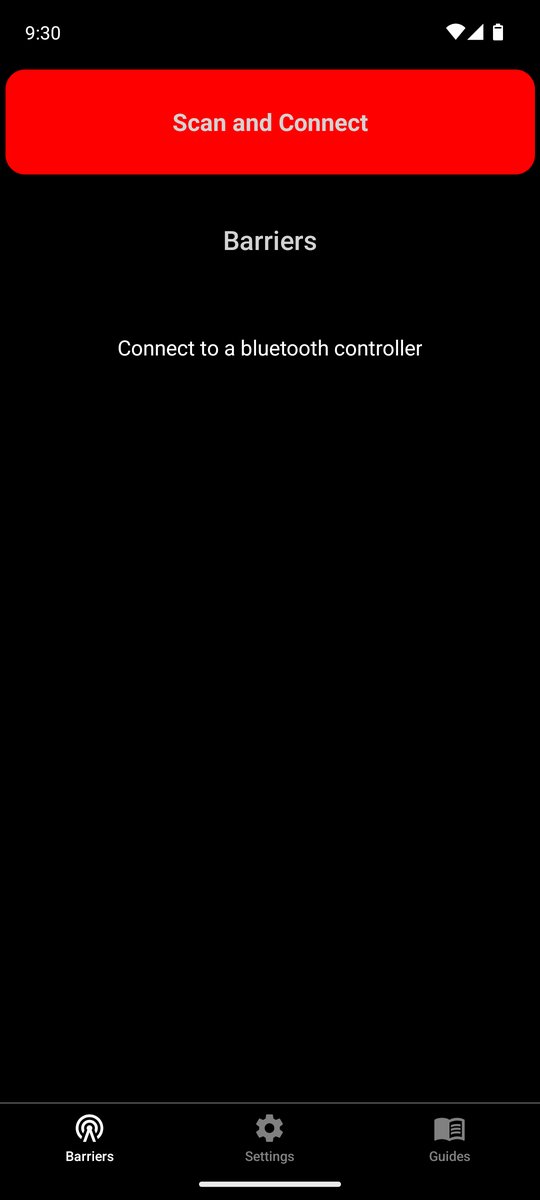
- Open barrierView. On the Barriers tab, tap the red Scan and Connect button.
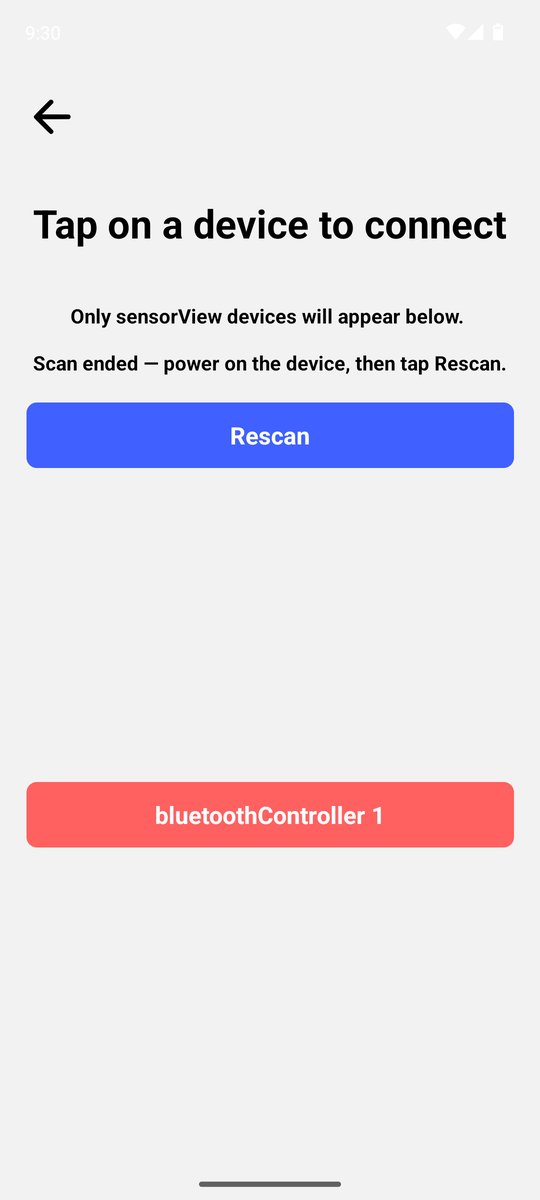
- The scan takes up to 10 seconds. Tap your controller in the list: it shows as bluetoothController with its number. Rescan looks again.
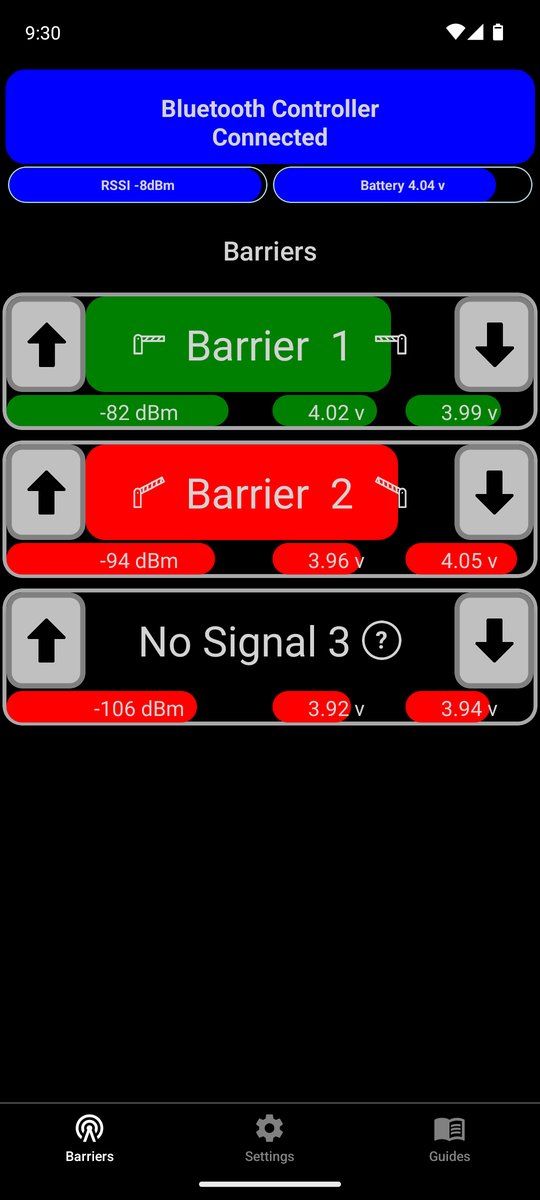
- The button turns blue and reads Bluetooth Controller Connected. Under it are the phone's signal to the controller and the controller's battery.
To disconnect, tap the blue button. If the link drops by itself, the app keeps trying to reconnect for up to an hour. It does not connect by itself when you open it.
5.2 Reading a barrier
A tile appears for each barrier the next time it reports. With the standard settings that can take up to about 3½ minutes; a master or gate controller also reports when it is switched on.
| On the tile | What it means |
|---|---|
| Green | Down: both arms report down |
| Red | Up, or not known |
| Amber | The barrier has just received a command and should be moving |
| No Signal | No report has arrived in time. The coloured bar is empty; the figures under it are the last ones received |
| The coloured bar | Counts down to the next report. It shortens while the barrier is quiet and fills again each time it reports |
| Signal, in dBm | The barrier's radio signal at the Bluetooth controller. Closer to zero is stronger |
| Battery, in volts | The level of each of the barrier's two controllers, master then slave. It is shown as volts per cell: 4.10 v is full, 3.60 v is flat |
Treat No Signal as "not known", not as "down". The barrier may have a flat battery, be out of range or be switched off. Tap the ? on the tile for how long it has been quiet and what to check.
5.3 Lowering and raising a barrier
Check the barrier number on the tile against the number on the barrier's sign.
- Tap the down arrow (right of the tile) to lower the barrier, or the up arrow (left) to raise it. All the arrows rest for about 3 seconds after a command.
- The tile turns amber when the barrier answers.
- About 20 seconds later the barrier reports, and the tile turns green (down) or red (up).
If the tile shows a warning instead:
| Warning | What it means | What to do |
|---|---|---|
| UNCONFIRMED, stand clear | The command was sent but the barrier did not answer. It may still move | Keep clear of the arms. Wait for the barrier's next report, then try again |
| NOT SENT | The command did not leave the phone | Check the button is blue (connected), then press the arrow again |
5.4 Alerts and settings
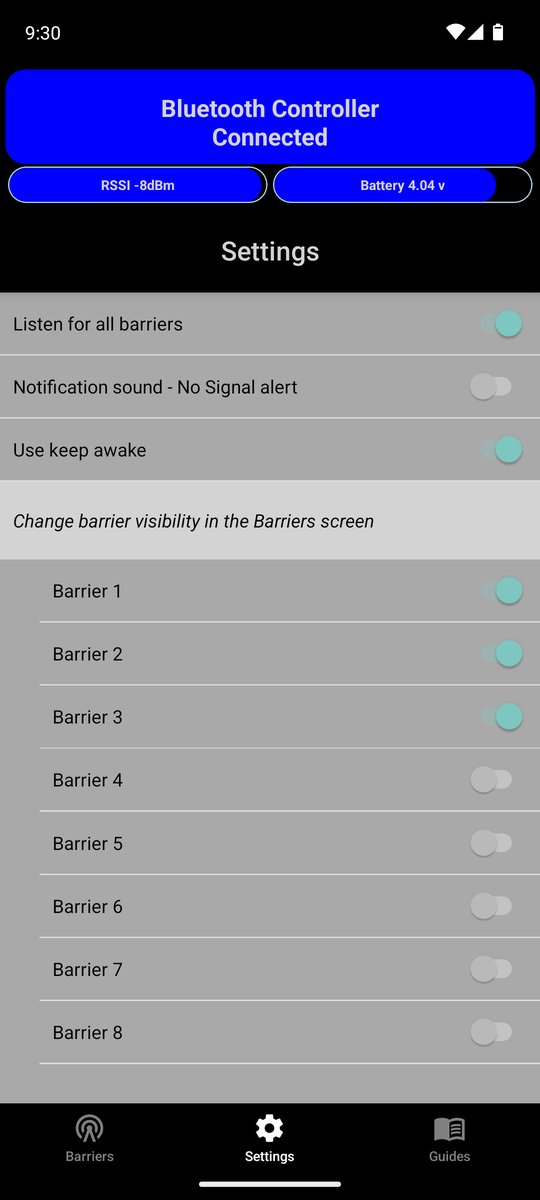
When a barrier goes to No Signal the phone vibrates. For a sound as well, turn on Notification sound - No Signal alert in Settings.
Keep the app open on the screen while you rely on it. With the app in the background or the phone locked, it gives no No Signal alert, by sound or by vibration. Use keep awake in Settings (on as supplied) stops the screen sleeping while the app is open.
The Settings tab also has:
- Listen for all barriers. On: a barrier you have hidden comes back when it next reports. Off: it stays hidden. It is on each time the app starts.
- Barrier 1 to Barrier 8. Show or hide each barrier's tile.
5.5 Scan and Set
Scan and Set gives a controller its role and number from the phone, for a controller whose role switches are in the APP position. With no controller connected, the button at the top of the Settings tab reads Scan and Set. Pick the controller, choose its role and number and tap Set. It restarts a couple of seconds later as what you set.
A controller set to master, slave or gate drives its arm up when it restarts.
5.6 Guides
The Guides tab holds the app guide, the assembly guides and the controller guide. They are part of the app, so they work with no signal.
6. The arms and brackets
6.1 Barrier arm hinge
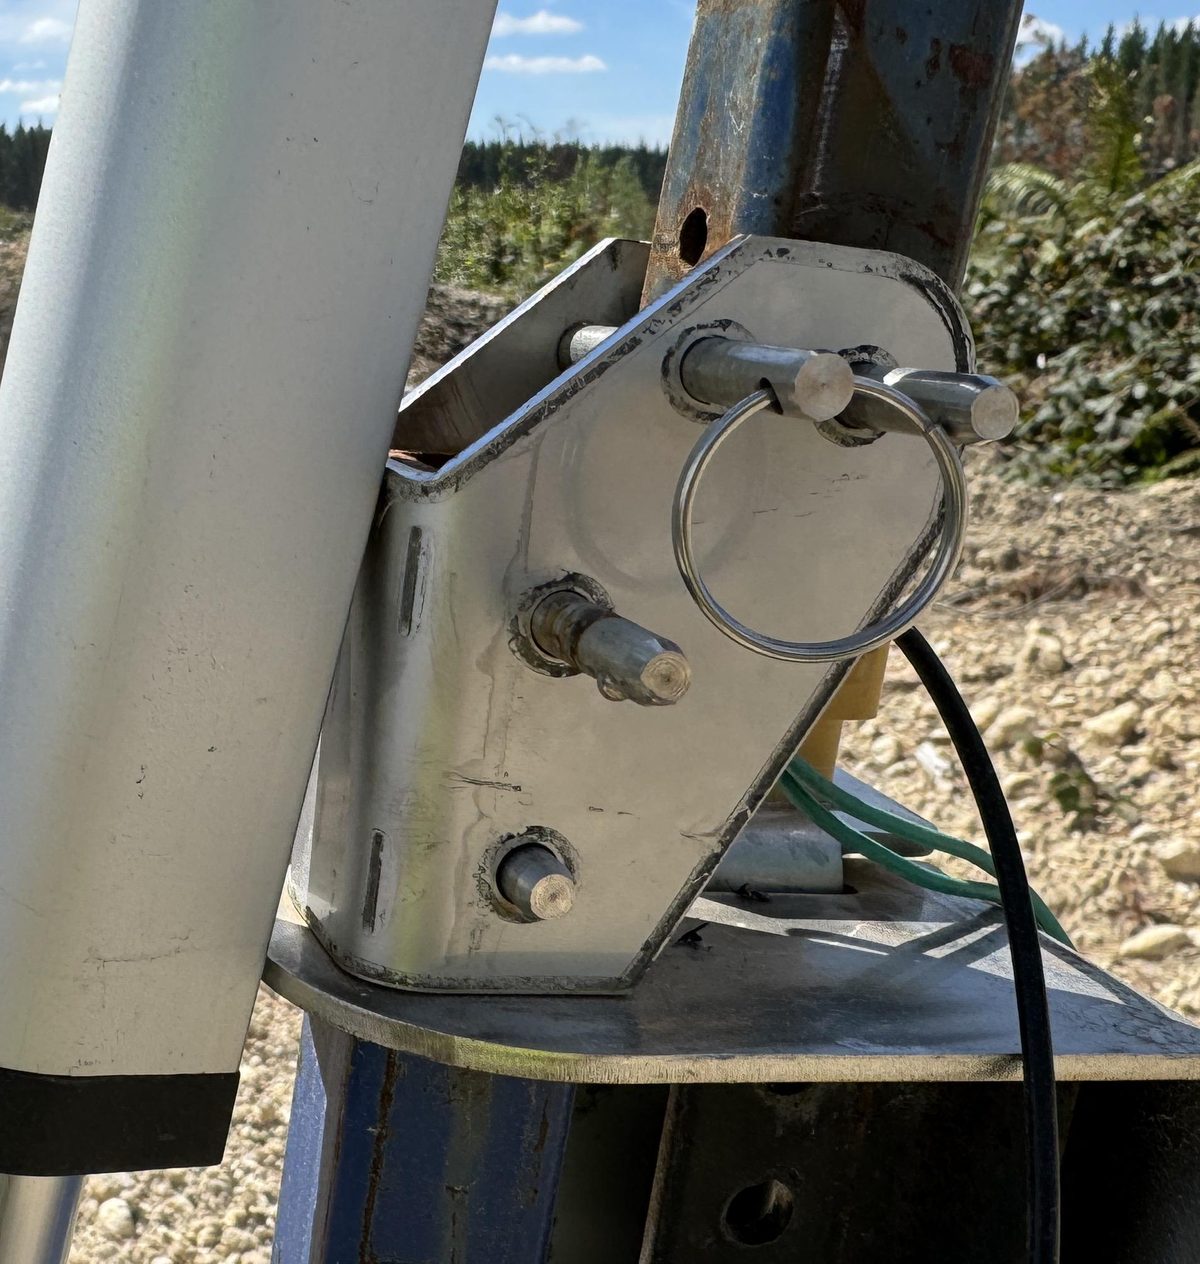
The hinge has a pin position that locks the arm upright. Pin the arms upright when the barrier is not in use, so wind cannot damage them (picture 2).
6.2 Actuator pivots
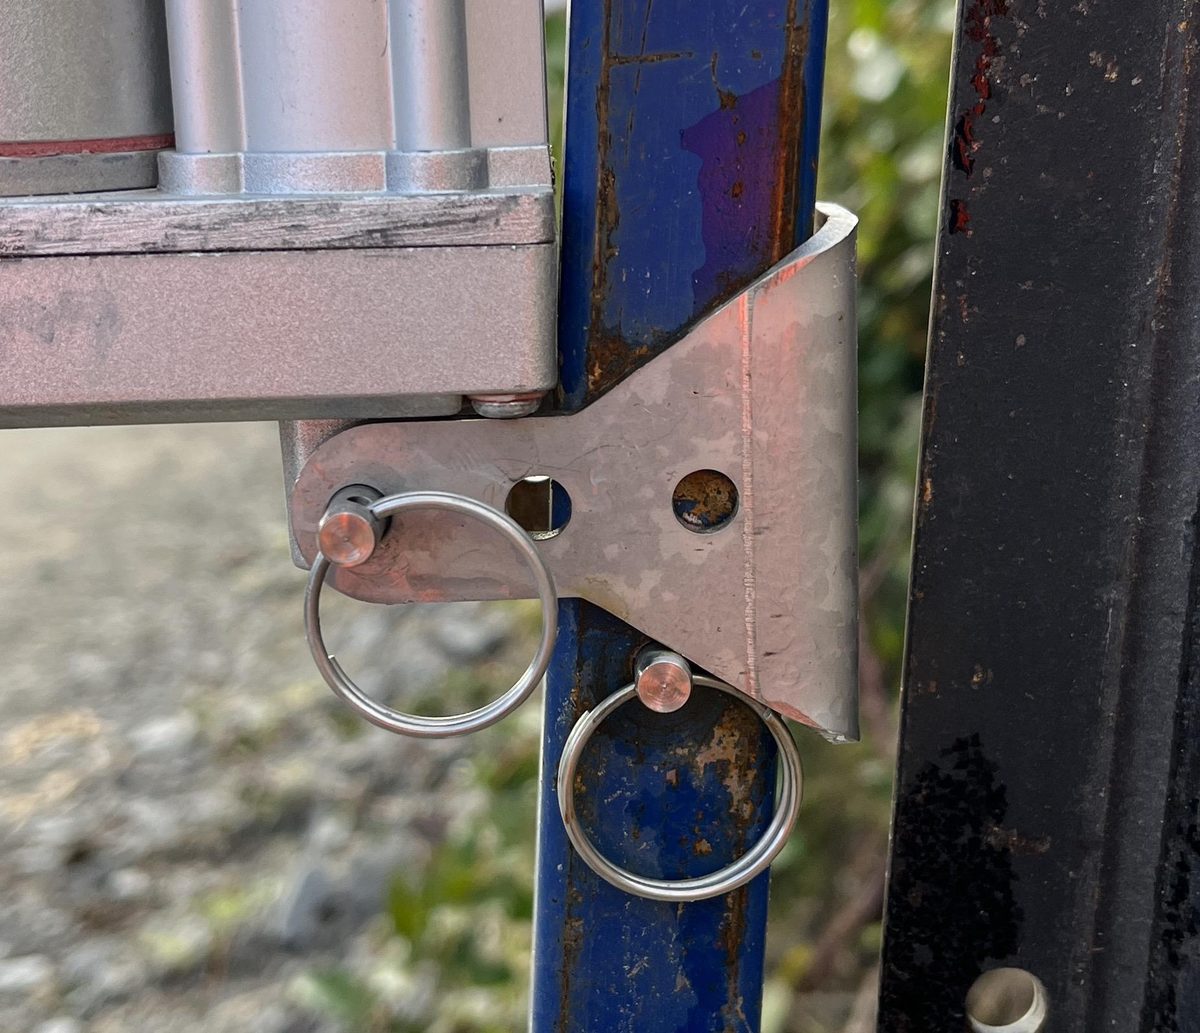
The pivot on the horizontal arm may be locked. The pivot on the vertical arm must be left free to slide, as in picture 3. Locking it can damage the controller.
6.3 Waratah brackets
Two brackets hold the barrier to the waratah: one at the top and one midway, pinned through the vertical square pipe.
The bracket cut-outs do not allow for a bent or mushroomed waratah. Drive the waratah with a waratah rammer. If the top is deformed, cut it back to a clean section. Use a waratah extractor to take it out.
7. Problems
Start with what the app shows.
| What you see | Likely cause | What to do |
|---|---|---|
| The controller is not in the list after Scan and Connect | It is off or flat; another phone is connected to it; the phone's Bluetooth is off | Switch the controller off and on, then tap Rescan. Check Bluetooth is on. Close barrierView on any other phone nearby |
| It connects, but no barriers appear | No barrier has reported yet; the barriers are off or out of range | Wait up to about 4 minutes, or switch a master or gate controller off and on (stand clear: the arm goes up). Check the antennas at both ends |
| "Bluetooth Controller Unique ID Required" | The app has not yet heard a barrier through this controller | As above: once one barrier has reported, the arrows work |
| No Signal on one barrier | A flat or switched-off controller; out of range; an antenna off or damaged | Tap ? on the tile. Check both of the barrier's controllers are on and charged and their antennas are fitted. Treat the barrier as not known until it reports |
| The tile turns amber, then No Signal | The master has the command but the slave is not answering | Check the slave controller is on, charged and has its antenna |
| UNCONFIRMED, stand clear | The barrier did not answer the command | Keep clear. Move the machine or the Bluetooth controller's antenna for a better signal, then try again |
| One arm up and one down | The actuator cord is caught, or one controller is flat | Check the cord runs through the hinge pin ring (picture 4). Check both controllers are charged |
| The tile stays red with the arms down | A tilt sensor is unplugged, or an arm is not fully down | Check both tilt sensors are plugged in (black to black) and both arms are below 45 degrees |
| Both arms went up without a command | A controller restarted: it was switched off and on, or its battery ran flat and recovered | Charge both controllers. A barrier controller always drives up when it starts |
| An arm does not move, or the arms move oddly | The lower actuator pivot is fitted wrongly or locked; the actuator is frozen | Fit the pivot as in picture 3. Thaw a frozen actuator before running it |
| No power light | The battery is flat | Charge it with the controller switched off (section 3.3) |
Still stuck? Email support@sensorview.nz with the barrier number and what the app shows.
8. Safety
8.1 General
- Do not open or repair a controller or a linear actuator.
- Pinch and crush points. The arms have places where moving parts meet. Follow the assembly guide, and keep clear while a barrier is moving.
- Arms move when a controller starts. Stand clear when switching a barrier controller on.
- Do not use the app while operating a machine. Stop the machine safely first.
8.2 Lithium-ion batteries
This product contains lithium-ion batteries. Handled wrongly they are a fire risk. Follow the instructions for use, charging and storage.
Do not:
- take apart, crush, puncture or burn a battery;
- leave it in fire, extreme heat or direct sunlight;
- short-circuit its terminals;
- put it in water or any other liquid;
- use it if it is damaged, leaking or swollen;
- leave it where children or pets can reach it;
- charge it with equipment not made for this product, or for longer than it needs;
- put a used battery in household rubbish. Dispose of it as your local rules require.
In an emergency:
- Leaking: do not touch the liquid. Wear gloves, and dispose of the battery as your local rules require.
- Overheating or fire: if it is safe, move the controller to a surface that cannot burn, away from people. Call emergency services (111 in New Zealand) if needed.
Reference pictures
Keep this manual for future reference.